Sunday, April 25, 2010

Candji's Silk Ribbon Embroidery RR #1 block

Candji's first nakid block went missing in action, so she quickly put together another for the CQI round robin.  This is a 16" x 16" block and here it is after I finished my additions to it.  I am the first stitcher to work on it and I started on the peach patch with a rose tree, some foxgloves, iris and little filler flowers.   The pink ribbon roses are quite tricky to do properly.  I used 13mm ribbon which gets pulled to the right side and then twisted many times.  Put the needle through to the back of the work very close to the place the ribbon came up, and fold the ribbon over at the half-way point, hold it and let it twist on itself. Gently pull the needle on the wrong side and this pulls the twists flat into folds which really look like roses.  The trick is to keep the shape of the folds without it unfolding all over the place.  I have many small stitches holding the petals in place.  I loved the look of the strip of green velvet and added big pansies in 13mm ribbon.  I kept the seam treatments small and quiet so as not to intrude on the SR embroidery. Note:  I changed the photos from centred to left alligned and somehow that changed their order around.   Sometimes I just don't understand Blogger's internal workings!

Wednesday, April 21, 2010

East End Cake Decorators - April 2010 Meeting

We had a full program at our East End Cake Decorators' meeting on Sunday 18th April.  Shaon led a fun workshop where we learned how to make realistic teddy bears and elephants.  The first photo is our instructor, Shaon with her two little critters, and the next photo is a grouping of all of our pretty acceptable and recognizable animals.  Thanks Shaon!Next on the agenda, Glenys demonstrated her new airbrush, and then we all had a chance to try it out. 

Our next meeting is May 16th.   Shaon has offered to demonstrate gumpaste roses and I will demonstrate the gumpaste tulip.


Paper pieced quilt....continued

After this morning's work on our quilt at St. Margaaret's in the Pines, we finished joining the individual squares into strips, and pressed it all.  What a difference it made when we lined it all up properly.  In the photo are Joyce, Dorothy, Susan and Cynthia, some of our ladies who have helped with cutting, piecing, pinning, ironing and sewing (and unpicking on occasion). 

Tuesday, April 20, 2010

Meg's BB&B Block


This is Meg's Bees, Butterflies and Beetles RR block after Arlene, Cathy and I have worked on it.  Nicki Lee gets it next for her stitching and then it will go home to Meg.

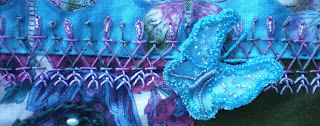
I added the stumpwork turquoise beaded silk butterfly and the seam it's sitting on.  The seam is made up of two rows of chevron stitch, with two fly stitches below and alternating lazy daisy and pistil stitch on top.  I added some beads in the lazy daisies and used Edmar Frost thread

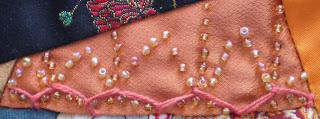
On the seam above the pink lace butterfly at the top I stitched four rows of fly stitch, also with Edmar Frost and added tiny gold beads.  The butterfly in the next photo was printed on the fabric already.  I outlined it in the same tiny gold beads (#13/0) and added lazy daisy stitches and green beads on the wings.

The final patch is very pretty purple and turquoise flowers.  I attached a purple jewelled butterfly right in the middle with dark green whirly stitching and freshwater pearls.  

Thursday, April 15, 2010

Paper pieced quilt

                                                                                                 The craft group I belong to at St. Margaret's in the Pines usually make a quilt every couple of years for a raffle. We bagan this one last year.  This star design uses pieces of paper marked in triangles with cutting lines and sewing lines.  This is Susan, our fearless leader who knows all about quilts, quilting, sewing machines, and is a great resource for the rest of us who only have a very limited knowledge of all of the above.

The fabric for this quilt came from the stash of one of our dear friends who passed away and left a wonderful assortment of colourful cottons.  So, as well as being an interesting, vibrant quilt to work on, it is a joy to make.

We began this last year and have diligently sewn block by block, week by week (with a few weeks time out to make Easter eggs), and now finally, we have enough blocks to put it together.   For a non-sane-quilter (as opposed to a crazy quilter), it was very uncomplicated to do.  Susan divided the fabrics first into colours, then within the colours were "lights", "mediums" and "darks".    She cut the fabric into strips and then placed two different right sides together and pinned thm to the paper for us to sew.  It seemed like magic the way it worked, but of course it's not.  The paper pieces are called "Thangles" (  http://www.thangles.com/howtheywork.html ) and would inspire me to tackle a quilt with so many points to match, without a second thought.

The first photo shows one finished block sewn together, and one just stuck to a piece of flannelette before sewing. 

The next photo is the blocks all laid out on our working table to get the same design from the pattern we used.

And the third photo is one finished block to show all the different patterned pieces and how the dark triangles make up the star.

This past week I sewed together the first row of blocks.  I'm sure next week we will have sewn it all together ready for the border.  More photos next week!

Monday, April 12, 2010

This year's egg

I am invited each year to my friend Sonja's family's traditional Ukranian egg decorating marathon!  It's so much fun!  This is my third year doing the eggs, and I can say that my hand isn't getting any less shakey, but the end result sure looks nice nestled in their thrift store brass egg cups, sitting on my cabinet. 


Sunday, April 11, 2010

More on Meg's Asian RR block.....


Honestly, I had Meg's block wrapped up, sealed, addressed and in my bag to take to the post office and I just couldn't do it.  The Mandella was bugging me because the beads didn't really lay the way I wanted to, and this block is exquisite and my bit of beading stuck out like a sore thumb!  I had used delicas which are a size 11/0 but for the new mandella, I went to a smaller size 13/0 Charlottes which made a much neater job.  I had to take some liberty with the design, but it is now ready to mail.

The next photo is the bottom part of the block with my stuff.

Monday, April 5, 2010

Meg's Asian block ready to move on!


Ohhhh.....I've been battling for an hour this morning to get these photos to go in the right order, but there seems to be no logic to loading pictures.   I can't waste any more time on this, it is what it is.  When Meg's Asian block arrived I was in awe of the stitching already completed by Rita and Darlene.  To start with Meg puts together beautifully pieced blocks with lovely material.  Her theme for the block was Arabian.  I searched the web for some inspiration and came up with a carpet, a mandella and a tile design. Above is the carpet on the block, and the inspiration carpet on the left. 

Next is an Arabian tile design which I duplicated on squared paper using one of Carole Samples templates.  The paper was great to keep the pattern straight.   The design is embroidered with gold thread and is quite delicate. 


The fabric next to the silky was covered in ferns printed in gold on the fabric I went over it in fly stitch with gold thread.   The mandella was also taken from an Arabian design which I did mostly in beads.  Next the block moves on to Nicki Lee who will work her magic!

Saturday, April 3, 2010

More stitching from my sister

A few weeks ago while my sister was visiting she started work on one of my Asian blocks.  Apart from seeing my CQ work, she had never worked on CQ blocks and hardly ever embroidered in her life before.  But she is very creative and has a good eye for design and colour.  So, while I was away in Florida she spent some time with Mum and picked up the CQ block again.  This is what she accomplished during her visit.  I left out Judit Baker Montanna's Elegant Stitches as a reference for stitch instruction.  Thanks Helena!

Wednesday, March 31, 2010

Jack's block finished

Jack's block is finished.  That is I've finished the embroidery but still have to bind it (I've cropped the raw edges out in the picture.)  The two close ups are my favourite bits on the block.  The first is a row of long bullions to make a small seam that doesn't intrude onto the photo of Jack.  I can see that they are not nearly perfect, but honestly they look better in reality than in the photo.  I used Edmar thread on most of the stitching, and it is more difficult to work with than perle, but It does give a nicer look, and is worth the trouble of ironing each length of thread!  The second favourite is the patch with the feather stitch filling up the centre with the double cretan on one side the buttonhole and chain on the other.    

Monday, March 22, 2010

Karrin's Stumpwork block ...... continued

I added a wheelbarrow carrying a fir tree that's waiting to be planted

Friday, March 19, 2010

Karrin's Stumpwork Block

Here's what I have been working on for the last few days.  This is Karrin's stumpwork block in a CQI RR and I am the first to work on it.  It's quite a small block as blocks go, 9" x 12" with lots of patches of different mossy green fabrics, so I kept my work fairly small.   The tree has a raised stem band and lots of bullion cherry blossoms. The pink, blue and lilac delphiniums are raised chain bands with wrapped stem stitch stems.  The chrysanthamums are whipped spiders' webs with french knot middles and various woven picot leaves. I used the cast on stitch for the pansies which are in a rockery on the block.  The sunflower petals and leaves are also woven picots, and the stem is the raised stem band.  The bee was worked on felt and then attached to the block. When I took the block photo my little bee was protected by a piece of organza ribbon just so he doesn't get damaged.  The wings are quite fragile.  One stitch I tried several times but I just couldn't get it right is the raised cup stitch.  Does anyone have any pointers?  Mailing out date is the end of March, so I still have time to maybe add something else!

My Florida Sewing Spot

This is my comfortable Florida sewing spot that my friend Mo organized for me while I am on vacation here.  I have everything around me that I need, my supply of books, silk ribbons, threads and beads and the OTT lite.  Most of my supplies you can't see because stuff is also on the floor around my feet.  I have one of the sofa cushions and a soft cushion at my back, which leaves a big hole to the side of me where I have a box full of my threads.  It always looks a mess, but we all know you can't sew CQ and be tidy!

Sunday, March 14, 2010

Elijah's birth announcement block

In between the CQI Round Robins that I am working on, I have been trying to get caught up with these announcement blocks for my five grandchildren.  This is Elijah, my youngest at 4 months.  The two next in age, Brynn, one year and a bit, and Josh, 2 years and a bit I have completed.  The other two, Jack nearly 7 years old and Caleb 3, were born before I began crazy quilting, so I am playing catch up.  Jack's is almost finished and will be featured soon! 

Monday, March 8, 2010

Arlene's Silk Ribbon Embroidery RR

I'm in the sunny south with a tee shirt, shirt and two sweatshirts.  The weather has been pretty cool and I've had to keep my hands warm somehow!

I'm working on Arlene's Silk Ribbon Embroidery RR with CQI.  Her block is so pretty, all pinks.  It came from Candji who was the first to work on this block.  This picture is the block after both of our work.  My contribution was the very middle patch.  I usually am not so bold as to pick the middle, but this time it was the perfect shape for what I had in mind.  I added two tall stalks of hollyhocks, clusters of iris, daisies and snapdragons, with panseys and some un-named little flowers in the very front.  I  covered the two top seams with a dark maroon 4mm ribbon randomly attached with tiny pink beads.   Mostly I used variegated and plain 2 and 4mm silk ribbons, except for the hollyhock leaves which were done with 13mm ribbon. 


The next photo is a close up of the middle section. 
Just above the centre there was a nice little triangle that I put in an assortment of gathered ribbon flowers and leaves.  The two seams are herringbone in 4mm ribbon with some pink seed beads at the "V"s.