Tuesday, March 31, 2009

Another RR

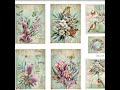
Completely naked and ready to go. This block is all shades of cream and coffee with just a hint of pink on the rose in the middle. This is CQI FFT (Fabulous First Timers) RR#7. My block will have quite a journey over the next few months. From Canada to Australia and on to Spokane, Washington. Then across the USA to Plympton, Mass., south to Lafeyette, LA and then north back to Canada and home.

Friday, March 27, 2009

Whatever Goes RR

This block began it's journey today to Deanna in Minnesota.
I didn't do a stitch on it before it left here. The colours are lilacs, purples and pale green. It will be back home in August if all goes well!!
Over the past year I've accumulated a few blocks. Below are two scenarios using the block above. One is using three lighter coloured blocks to make up a group of four. The other is a six block group using lighter and darker blocks. The background fabric is a dark eggplant/purple colour. Do you think that the dark blocks in the 6-group dominate too much?

Coffee Sleeve Swap received

This was made for me by Sandy from my Canadian Crazy quilters group.
There are so many pretty pieces of fabric and lovely stitching, and it does a great job of keeping the coffee hot and my hand protected. Thanks Sandy.

Monday, March 23, 2009

Coffee Sleeve

I made a coffee sleeve for a swap on crazyquilters-ca, a Canadian group that I belong to. It was my first attempt and a learning experience. I had another go and took photos at every stage, so it is an "on the fly" tutorial. Here it is finished.
These are the small and large sizes for a Tim Horton coffee.
I used the large cup, trimmed the top and bottom, cut about 1" off the top and 1" off the bottom., and cut straight down the seam of the cup. Then I marked on the pattern a 1/2" seam. (Note: I didn't need this seam allowance because I added it on to the muslin as you will see below.) I pinned the pattern to muslin and marked a line around the pattern and a cutting line on the muslin 1/2" from the pattern. Here's the muslin with the solid line being the actual size of the sleeve, and the dotted line the seam allowance. The extra fabric was my insurance, but was not needed.
Here I have placed the first piece of fabric (black) on the muslin.
I added a second piece of fabric, placed the two right sides together and sewed through the three fabrics. This photo shows the two pieces of fabric pressed and ready for the third.
The right sides of the second fabric and grey patterned piece of fabric are together ready to be sewn.
Seam sewn and excess black fabric trimmed.
Grey fabric sewn.
Next piece of fabric pinned, ready for sewing.
Fourth piece, sewn, ready for pressing.
As each piece of fabric is added, I trimmed the previous fabric to the shape of the muslin. I added two more pieces of fabric using the same method as before.
Trimmed
Embellish
I cut out a piece of black felt in the shape of the original pattern, pinned it to the embellished piece and tacked over the seams. I trimmed the seams to a bit more than 1/4".
Pin it around the paper cup. Neatly sew together. Embellish the joining seam. This is the smaller cup as I had cut up the large size for the pattern.
Cut out the lining with about 1/2" seam allowance. Sew in place.
Finish inside join.
Finished. This is the sleeve on a large Tim's cup. Just a note to say that the patterned grey fabric and the striped fabric are both from the skinny ends of men's ties.

Saturday, March 21, 2009

East End Cake Decorators - March 15th Workshop

We had a very full and busy meeting this past Sunday. Glenys Davies demonstrated how to use damp crystallized sugar in an egg mold to make a cradle suitable for use on a baby shower cake or a Christening cake.
Glenys and Valerie Pais had a few samples prepared to show different finishing options. Valerie also had a sample of a Christening cake topper with a baby in a rose. My apologies to Glenys and Valerie for lack of photos of them working, I was so involved in their demo that I forgot all about my camera and taking action pictures.
Next was Judith Parker who showed us how she makes the puffy bow (or ribbon bow) using fondant and a mound of royal icing.
She began by making about 20 strips of fondant all the same size, she pinched the ends together, shaped them into an oval shape and placed them on their sides to dry. You can see some made in front of Judith on the table. In the photo she is piping a mound of royal icing onto a gum paste plaque.
Next, Judith pushes dry loops into the royal icing, making the first row that is sitting on the plaque. She carries on, row by row until the bow is full looking.
Here is the white bow finished, and a pink and green made earlier.
She mentioned that the colour of the royal icing should match the loops of the bow.
David Hall had a bunch of graham wafers left over from the Valentines boxes, so we used them up making an Easter Basket. Glenys and Valerie generously shared their flowers and butterflies from their demo so the baskets/wishing wells were decorated.
The next meeting will be held on April 19th, 2pm to 4pm. Details of this meeting are not finalized yet. I'll add them to this post once they are.

Wednesday, March 18, 2009

A really early sign of Spring!

Seen today in my friend Verdie's garden. It's been way above freezing for a few days, which has encouraged these dainty snowdrops to show themselves, but colder weather is moving in tonight.

Sunday, March 15, 2009

80*F >>>>>> 24*F

For for those of us in the Celius mode: 26*C >>> -4*C. The beach at Nokomis is part of Casey Key, on the Gulf side of Florida.
Seafood was on our menu lots of times, and shrimp boiled in seawater is to die for!.
Crab was on sale at Publix and there were lots of loose claws. This was a great meal!
Before I left on my vacation I was lucky enough to find this great bag in Fabricland, on sale for $9.99! It's about 12" x 8". On the outside it has two large pockets, one zippered and the other with Velcro.
It comes with two "pages" with zippered pockets. The pages are anchored with strips of Velcro so they are removable. This is the middle where I have a variety of threads.
This is inside of the outside back. The inside of the outside front has one large zippered pocket that I filled with bits of lace and trim.
The sewing case was so great that I decided to buy another one just to get the two removable sections and add them to my original case. There were no black cases left, so I took the white.
The other double page I filled with beads. I used very small plastic bags to hold small amounts of various colours.
Security is very tight on the airlines, and on my last trip I had to forfeit my tiny scissors. There's lots of time to sew while waiting for planes and you absolutely need something to cut the thread. This little bit is part of a dental floss cutter. It measures only 1" x 1/2" and does a great cutting job.
These were some of the small projects I took with me to work on. They are all needle cases. The orange (above) and lilac ones (below) are folded in half.
Above is how this one looks folded with two folds. On the left is it unfolded.
These two needle cases are still unfinished.
There's lots of interest in making paisley motifs on the CQ websites, so here's my first attempts. The top one is 2 1/2" x 1 1/4". The other I'm still working on, and I like how it looks. It's bigger, 3" x 2 1/4". The sequins are all the same colour!
This is Lilifee my new Garden Angel Dotee. She came from Miriam in Germany in a Swap-Bot swap recently. She loves her new home in the orchids.
So now I'm home and need to get caught up with the daily chores. But not yet ......SharonB has just posted March's Stitch Explorer Challenge technique and I must have a go at that before I do the laundry!!
Added Monday, 16th March. This is finished now. The colours are better in the unfinished one above.